Go serverless with aws Api Gateway + Lambda + DynamoDB + CDK Part I
In this Article
Overview
The beauty of FaaS or Function as a Service as opposed to SaaS is that it offers a more flexible costing model while pushing away the overhead of managing server instances and scaling. It makes it a great solution when you want to code an application with limited resources. A managed infrastructure means that you can focus on building your application faster. This is a two parts tutorial. In this first part I am going to cover how easy it is to setup serverless services with ApiGateway, Lambdas, DynamoDB and CDK.
The Solution
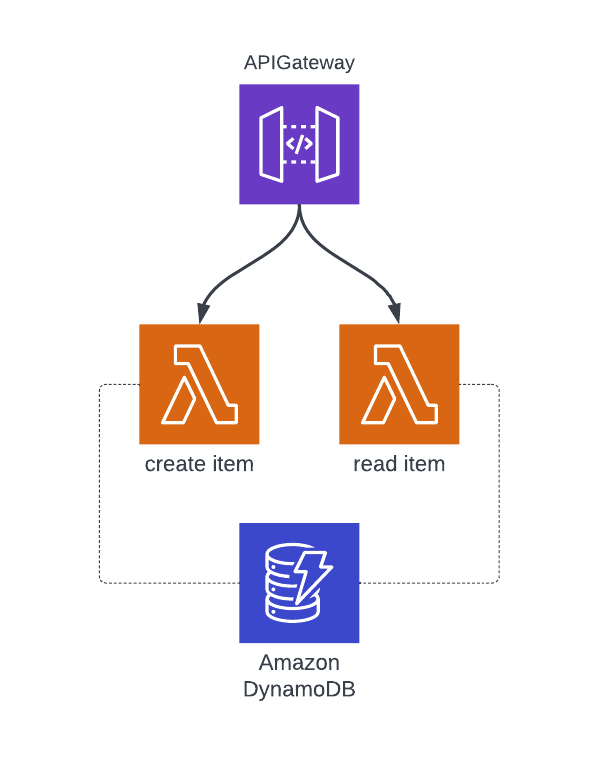
The solution is pretty simple. I am going to have an Api Gateway triggering lambdas to perform CRUD operations on todo list items. Each lambda will perform some kind of validation and finally query the DynamoDB table.
The Stack
I am going to code this project using Typescript. To provision the infrastructure I will use the aws Cloud Development Kit aws-cdk. I will write unit tests using jest.
Create an AWS Account
Feel free to skip this part if you already have an aws account. Creating an account is simple, just navigate to aws and click on the Create an AWS Account button. The next step is to create an IAM user that we will be using later to configure the aws-cli.
- Log in to the aws console and select the IAM service
- Select users on the left side menu
- Click on the Add user button
- Enter a username like admin for example and check the Programmatic access checkbox
- On the next page, select Attach existing policies directly, search for AdministratorAccess and select the policy
- Click next until you get to the review page then click on Create user
- Click show to see the secret access key and note down its value along with the access key id
In a real case scenario you should provide more specific policies and add additional info about the user being created, however this will be enough for the purpose of this tutorial.
The next step is to install and configure the aws cli. Assuming you are on a mac run:
$ brew install awscli
Once the installation completes successfully, go ahead and configure it by running:
$ aws configure
Enter the access key id and the secret access key that you noted down when you created your account. You can press enter for the region and output format to use the default options.
Now you should be able to run a simple command to verify the cli has been correctly configured.
$ aws s3 ls
Now we are ready to start setting up the project.
Project Setup
When it comes to setting up a project, I am not a fan of using cli or templates. They tend to come with a lot of boilerplate that is not necessarily needed. It can additionally result in an overwhelming experience if I don’t know what some files or folders are there for. I like to be in control of the code I write, therefore we will be creating all files one by one.
- Create the project directory:
$ mkdir todo-services && cd todo-services
- Initialize the yarn project and git repository
$ yarn init -y
$ git init
$ touch .gitignore
$ touch README.md
Add node_modules to the .gitignore file so that node modules will not be tracked. Add an initial description to the README.md file. Then go ahead and commit those changes.
At this stage your package.json file should look something like this:
{
  "name": "todo-services",
  "version": "1.0.0",
  "main": "index.js",
  "license": "MIT"
}
Let’s start by installing the required dependencies:
$ yarn add --dev typescript ts-node aws-cdk aws-cdk-lib aws-lambda @types/aws-lambda constructs jest @types/jest ts-jest @swc/jest @swc/core
Here is how I have setup the folder structure:
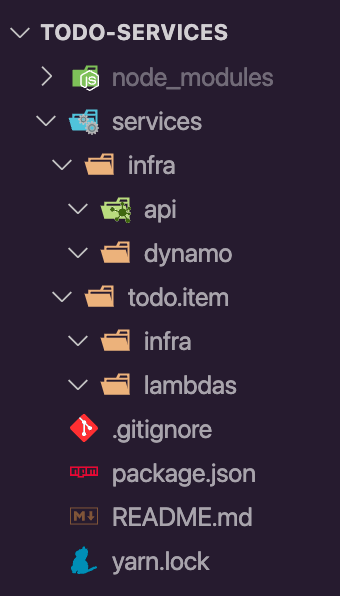
Under services/ I want to keep everything that is related to the serverless services like lambdas and infrastructure. You’ll notice I have 2 infra folders one under services/infra and another under services/todo.item/infra. The idea is to use the first one to store reusable infrastructure definition with cdk and the latter to actually call those constructs. Needless to say the lambdas folder, you guessed right, will contain the lambda functions.
Before proceeding with the implementation let’s finish configuring cdk and jest. Run the following:
$ npx ts-jest config:init
That should have generated a jest.config.js file with the following content:
/** @type {import('ts-jest/dist/types').InitialOptionsTsJest} */
module.exports = {
  preset: 'ts-jest',
  testEnvironment: 'node'
};
Let’s make some changes to that so that @swc/jest is used as a transpiler (ts-jest is very slow in comparison see this article). Add the following to the jest.config.js file:
/** @type {import('ts-jest/dist/types').InitialOptionsTsJest} */
module.exports = {
  preset: 'ts-jest',
  testEnvironment: 'node',
  transform: {
    '^.+\\.tsx?$': ['@swc/jest']
  }
};
Add the following tasks to your package.json:
{
  ...
  "scripts": {
    "test": "jest",
    "build": "tsc"
  }
}
The initial cdk setup is really simple. First create a main.ts file under services/infra. Leave it empty for now. Then under your root folder create a cdk.json file with the following content:
{
  "app": "npx ts-node services/infra/main.ts"
}
CDK will require Docker to be installed on your machine. If you haven’t already install docker, you can download the mac client from the docker webpage. Alright, the setup is complete, time to jump into the implementation. Follow part II of this tutorial to see these serverless services coming to life.

