Synchronize your app with Cloudflare Durable Objects
In this Article
Overview
Solving synchronization in distributed applications has always been a challenging problem to solve. Imagine for instance you are running your application in an Elastic Container Service with 3 running containers in a specific geographical region. You will have to do the heavy lifting of synchronizing multiple servers. Furthermore should you have other instances running in different regions you will have to take care of synchronizing instances across those regions. If your application is multithreaded you’ll have to consider synchronizing your threads. Given the proper time and resources in place, this is of course by all means achievable, however one has to wonder whether a more fitting building block exists that enable engineers to achieve a robust synchronization faster. If that is what you seek, look no further than Durable Objects.
Cloudflare Durable Objects
In Essence Durable Objects allows you to write code that runs on a Cloudflare Worker that provides low-latency coordination and consistent storage. If you wanna know more about how they work, the Cloudflare documentation provides an exhausting source of information and examples. If you are new to Durable Objects I suggest you have a read at this blog post 👉 here.
A Simple Example
I am going to implement a simple chat application that references every connected client with a synchronized auto-incrementing number. I am going to code my Durable Object using Typescript. I am going to use the latest version of the Wrangler CLI which at the time of writing is 2.6.1 The initial setup is really simple. First install the required dev dependencies:
$ yarn add @cloudflare/worker-types @types/node esbuild ts-node typescript -D
The boilerplate requires the following configuration files:
- A tsconfig.json to setup typescript
{
  "compilerOptions": {
    "outDir": "./dist",
    "module": "commonjs",
    "target": "esnext",
    "lib": ["esnext"],
    "alwaysStrict": true,
    "strict": true,
    "preserveConstEnums": true,
    "moduleResolution": "node",
    "sourceMap": true,
    "esModuleInterop": true,
    "types": [
      "@cloudflare/workers-types",
      "@types/node"
    ]
  },
  "include": ["src/*", "./index.ts"],
  "exclude": ["node_modules", "dist"]
}
- A wrangler.toml to configure the Durable Object and the Worker
#
# WORKER CONFIGURATIONS
#
name = "do-example-worker"
workers_dev = true
# currently the latest compatibility date at the time of configuration
compatibility_date = "2022-11-30"

#
# BUILD CONFIGURATIONS
#
[build]
command = "yarn build"

# define the build upload settings
[build.upload]
format = "modules"
dir = "./dist"
main = "do.example.worker.js"
#---------------------------------------------------------------------

#
# LOCAL CONFIG
#
[env.local]
name = "do-example-worker-local"

[env.local.vars]
FOO = "local-bar"
#---------------------------------------------------------------------

#
# DEV CONFIG
#
# override/define variables for the worker specific to DEV
[env.dev]
name = "do-example-worker-dev"
route = "api.coderpunk.dev/do/*"

[env.dev.vars]
FOO = "dev-bar"
#---------------------------------------------------------------------

#
# PRODUCTION CONFIG
#
# override/define variables for the worker specific to PROD
[env.production]
name = "do-example-worker"
route = "api.coderpunk.tech/do/*"

[env.production.vars]
FOO = "bar"
#---------------------------------------------------------------------

#
# DO configuration
#

[durable_objects]
bindings = [
  { name = "CHAT", class_name = "Chat" }
]

# Indicate that you want the ChatRoom and RateLimiter classes to be callable as Durable Objects.
[[migrations]]
tag = "v1" # Should be unique for each entry
new_classes = ["Chat"]
#---------------------------------------------------------------------
- An esbuild.js file to build the worker. Make sure to chmod +x this file
#!/usr/bin/env node
const esbuild = require('esbuild');

/**
 * The Chat DO WORKER build
 */
esbuild.build(Object.assign({}, {
  bundle: true,
  minify: false,
  platform: 'node',
  format: 'esm',
  sourcemap: true,
  target: 'node18'
}, {
  entryPoints: ['./index.ts'],
  outfile: `./dist/do.example.worker.js`,
})).catch(() => process.exit(1))
I am going to implement the client side with old school html/css/javascript. I am going to write a client side script named client.js to serve the index.html file that powers the frontend implementation of this example exercise.
const http = require('http')
const fs = require('fs')

const server = http.createServer((req, res) => {
  res.writeHead(200, { 'content-type': 'text/html' })
  fs.createReadStream('./index.html').pipe(res)
})

const port = process.env.PORT || 3000

console.log(`Server listening at http://localhost:${port}`)
server.listen(port)
Finally I’ll make sure that I have all the scripts I need to serve the application in my package.json
"scripts": {
  "build": "./build.js",
  "server": "wrangler dev --local --port 9090",
  "client": "node ./client.js",
}
With the setup out of the way, let’s see what the backend implementation looks like.
Implementing the backend
The backend will be composed by two files an index.ts which acts as the entry point and a chat.ts which holds the Durable Object class implementation. I am going to allow the client to specify any url path and use that as my unique Durable Object id. That means every client connecting to /123 will effectively be connected to the same instance. The implementation is really simple.
import { Chat as _Chat } from "./src/chat"

/**
 * Re-export the chat class to the esbuild can include it in the packaged file.
 */
export const Chat = _Chat

 export default {
  async fetch(request: Request, env: any): Promise<Response> {
    const url: URL = new URL(request.url)

    const chatId: string = url.pathname.slice(1)

    if (!chatId) {
      return Promise.resolve(new Response('Bad request', { status: 400 }))
    }

    // we have specified in the wrangler.toml that the Durable Object is bound to env.CHAT
    const doNamespace: DurableObjectNamespace = env.CHAT as DurableObjectNamespace
    // invoke the durable object instance
    return await doNamespace.get(doNamespace.idFromName(chatId)).fetch(request)
  },
}
The Chat implementation is going to use a websocket connection to broadcast messages to all other listening clients. Let’s define some fields
// auto increments for every connected client
private counter: number
// the durable object state object, useful to accessing the storage
private state: DurableObjectState
// a map of unique numbers and connections
private sessions: Map<number, Connection>

constructor(state: DurableObjectState) {
  this.state = state
  this.sessions = new Map<number, Connection>()
  this.counter = 0
}
If you are wondering what a Connection is that’s just a custom interface I have defined. Let’s look at the custom interfaces used in this implementation
export interface Message {
  from: number
  text: string
}

export interface Connection {
  id: number
  server: WebSocket
  client: WebSocket
}
The WebSocket constructor from the client is going to take care of performing an initial http request which is then upgraded to a websocket request. For this reason the first thing we want to do in our Durable Object implementation is check that we have a websocket connection:
const upgradeHeader = request.headers.get('Upgrade')

if (!upgradeHeader || upgradeHeader !== 'websocket') {
  return Promise.resolve(new Response('Expected upgrade: websocket', { status: 426 }))
}
Now that we know this is a websocket connection let’s accept the connection, assign a unique id to the client and store the connection to the sessions field
// increment the count, this is synchronized because we are in a Durable Object
this.counter += 1

// accept the websocket connection
const webSocketPair = new WebSocketPair()

const server: WebSocket = webSocketPair[0]
const client: WebSocket = webSocketPair[1]

server.accept()

// incoming messages event handler
server.addEventListener('message', (event) => {
  // parse the incoming message
  const message: Message = JSON.parse(event.data as string) as Message
  // broadcast the incoming message to all the listening clients, including the sender
  this.sessions.forEach((session: Connection) => {
    session.server.send(JSON.stringify({ from: message.from, text: message.text } as Message))
  })
})

// store the connection to the sessions map
this.sessions.set(this.counter, {
  server: server,
  client: client,
  id: this.counter
} as Connection)
Since the unique counter id is generated on the backend, we need to let the client know what its id is so it can send that along when sending the message. This is necessary for every other client to know who the sender is. Finally return the response
// send the id to the client
server.send(JSON.stringify({ id: this.counter }))

return new Response(null, {
  status: 101,
  webSocket: client,
})
This concludes the backend implementation. Fairly simple as you can see. Now this code is not without its flaws. For instance what happens when a connection is closed, or when an error happens? I am not too concerned about that for this example, however that’s something that should be considered for real world applications. Let’s peek the frontend implementation.
Implementing the frontend
All I want to do is have an empty div, open a websocket connection and start listening for incoming messages. Every time a new message is received I am going to store it onto an array and update my view to show all messages in that array.
<body>
  <div id="chat">
  </div>
  <div id="commands">
    <textarea id="send-content" name="send" rows="4" cols="50"></textarea>
    <button type="button" onclick="send()">Send</button>
  </div>
</body>
Let’s look at what the websocket connection looks like for the client
const url = new URL(window.location.href)
const chatId = url.pathname.slice(1)
const messages = []
let id = null

// initialize the websocket connection
const websocket = new WebSocket(`ws://localhost:9090/${chatId}`)

websocket.addEventListener('message', (event) => {
  const message = JSON.parse(event.data)
  if (message.text) {
    // this is a text message, push it to the array
    messages.push(message)
    updateView()
  } else if (message.id) {
    // this is the initial message with the id, let's keep track of what that is
    id = message.id
  }
})
Let’s have a closer look at the updateView() method
const updateView = () => {
  const chatEl = document.getElementById('chat')
  chatEl.innerHTML = ''
  messages.forEach((message) => {
    chatEl.innerHTML += `<div class="container ${message.from === id ? 'mine' : ''}">
      <div>${message.from === id ? 'me' : 'user ' + message.from}</div>
      <p>${message.text}</p>
    </div>`
  })
}
As you can see all that’s doing is just emptying the div content, then iterating over all the messages and adding html content for each message. The only bit left now is to implement the send() method to send the message to the backend
const send = () => {
  const textarea = document.getElementById('send-content')
  websocket.send(JSON.stringify({
    from: id,
    text: textarea.value
  }))
}
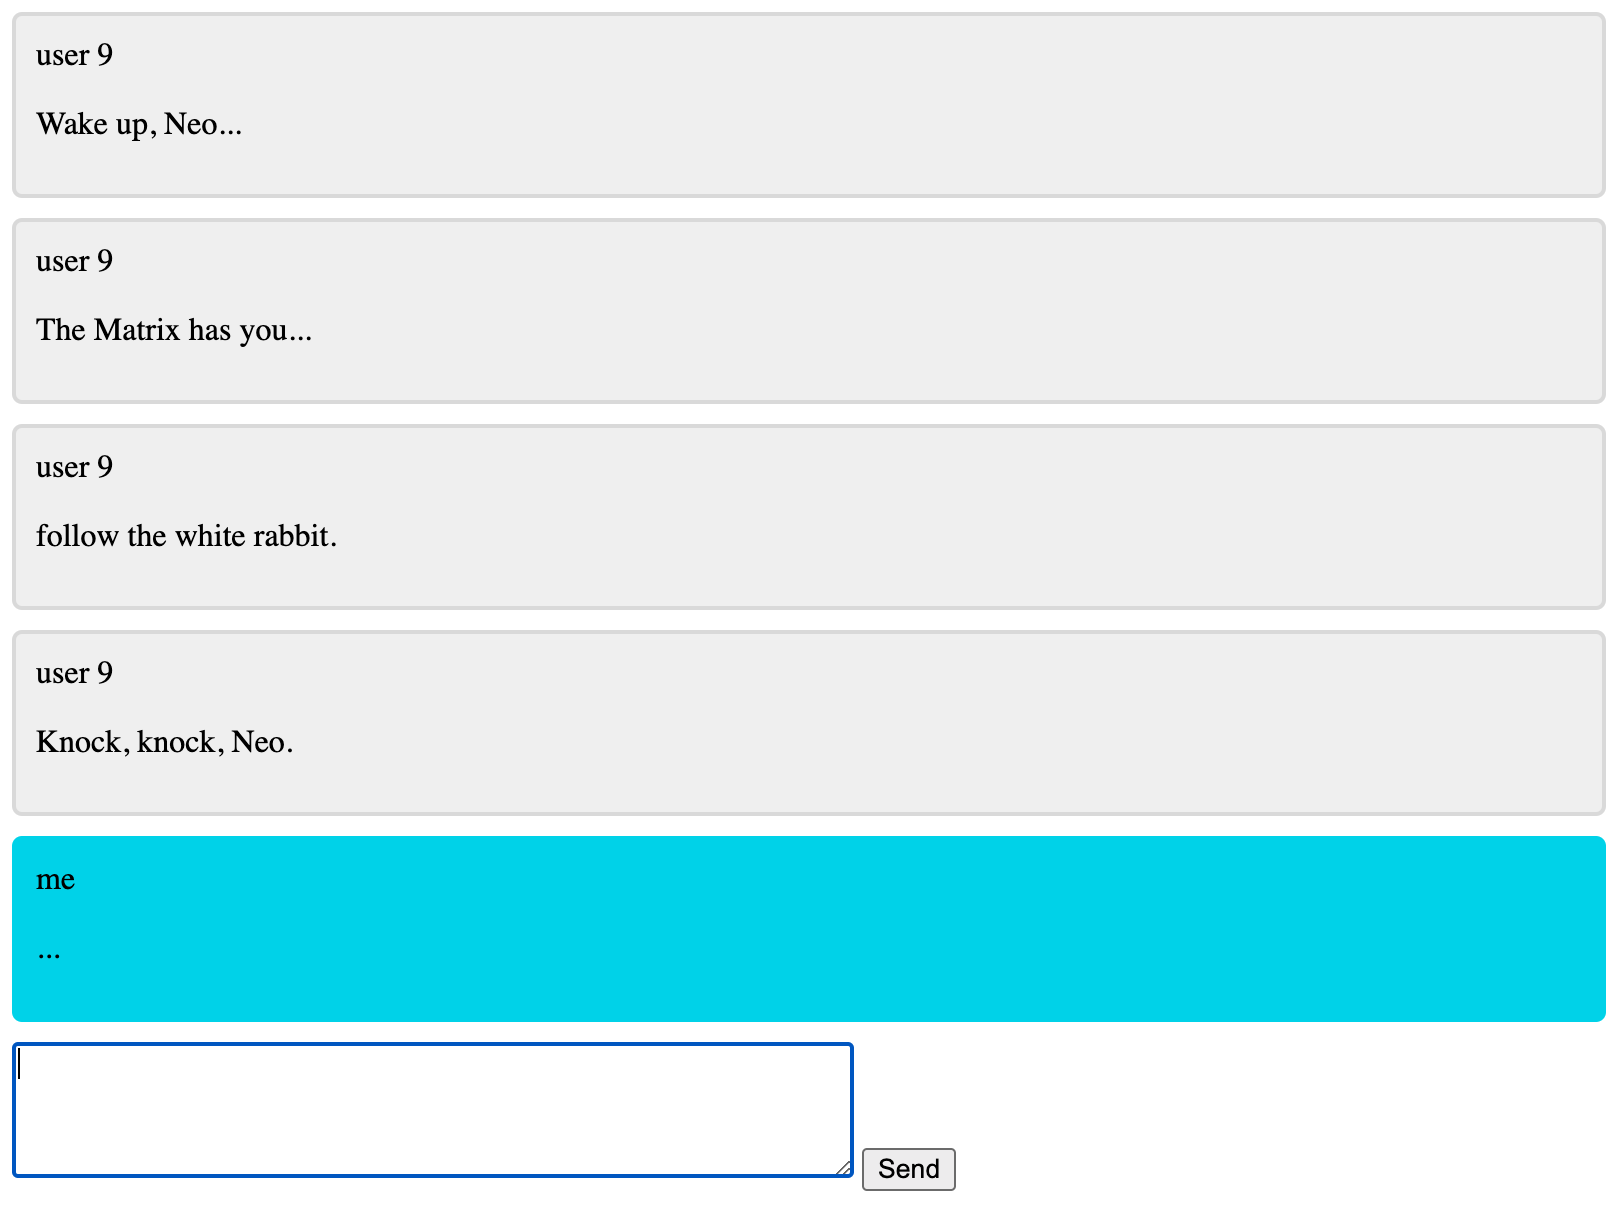
See it in action
Run yarn server and yarn client open two tabs on http://localhost:3000/123 and start typing and sending messages.
The complete source code for this exercise can be found in the cloudflare-series repository.

